Here is something new! Let's have a contest. Since it's July, let's make it a Christmas in July contest.
To enter, just leave a comment telling what Christmas quilting projects you are planning to make and where you got the pattern or inspiration.
I will start us off by saying that I plan to finish up a couple of Christmas UFO's that are in the closet in the sewing room. There are two throws that need to be quilted that were created after I read an article about Quick and Easy Quilts, and there's a wall hanging that needs to have the piecing finished. It is from a kit I ordered long ago from Keepsake Quilting. With any luck I'll finish these before Thanksgiving (just being realistic here).
So, what about you? What are you planning to complete before the holidays arrive? Enter your comments for a chance to win. One lucky reader will be randomly selected on August 15th. The winner will receive 6 Christmas themed fat quarters.

Thursday, July 18, 2013
Tuesday, July 16, 2013
Quicky Quilt
Get your mind out of the gutter- it's not about that! The weekend before the 4th of July found me working fast to try to make strip quilts for the grandkids' new bunk beds, since they would be coming to visit. I knew I needed something eye catching and fun, yet quick to make. So I adapted Dawn Cavanaugh's strip pieced placemat pattern and created quilts on the longarm machine. Here are step by step instructions for anybody who wants to make on of these super quick, super easy quilts. Don't worry if you don't have a longarm machine; you can easily create this on your domestic sewing machine with a large table to support the weight of the fabric, batting, and backing layers.
Supplies needed: 44-45" wide quilters cottons in various colors (around 10 fat quarters)
90" wide white cotton for strips and backing (5 yards)
90x108" quilt batting
rotary cutter and mat
acrylic 6 and 1/2" wide rulers
sewing machine
longarm or midarm quilting machine with some type of channel locks
Step 1: Choose a wide assortment of coordinating fabrics. These are from Cranston Printworks and Robert Kaufman fabrics. You will want some light, some medium, and some dark that go together, but still have some contrast. I chose pinks, blacks, and lime greens.
 Step 2: Cut the fabrics into strips along the straight of grain. I cut mine 4 inches wide by the width of the fabric (44 or 45").


Step 5: Take the colored rectangles you cut earlier to your sewing machine. You will be randomly piecing them together to create 90" long strips.
Just sew the short edges of the rectangles together using a 1/4" seam allowance. Try not to repeat the colors too close together unless you want a very patterned look.


You will end up with several strip sets. Press the seams flat on these. Be careful not to stretch the long strips.

Step 6: Load your backing fabric onto your longarm machine.

Then lay your batting on top of that.
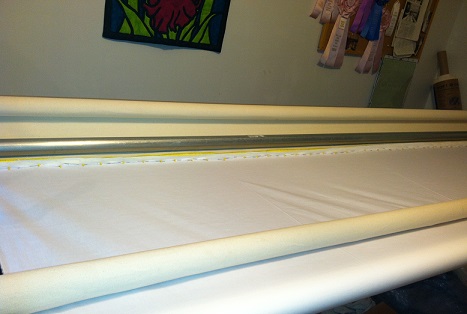
Step 7: Engage the channel lock on your machine so you can make a straight, horizontal line. (Mine uses clamps to hold the wheels in place) Stitch across the top edge of the backing and batting sandwich. This marks the line where you will lay your first strip.


Step 8: Lay your first white strip (right side up if using colored fabric instead) with the top edge just above the line you just stitched through the backing and batting. Now stitch that exact same line again, this time capturing your first white strip.

Then pin the strip down through the batting and backing so it doesn't flip when you sew on the first colored strip.
Step 9: Lay the first colored strip, right side down, on top of the white strip you just attached. Align the bottom edges together. (You might need to place a pin here and there to keep things in place). Reposition your machine and stitch the edges together.


Flip the colored strip down and it should look like this


Flip this open and you have this


Then, all you'll need to do is remove it from the frame and add the binding (or add it with the longarm). You will end up with a fun, fast quilt like the one below.
I hope you make one of these Quicky Quilts. The entire thing took me one afternoon to make, less than 5 hours. Be sure to leave me a comment and send me a picture of the quilts you make.
Supplies needed: 44-45" wide quilters cottons in various colors (around 10 fat quarters)
90" wide white cotton for strips and backing (5 yards)
90x108" quilt batting
rotary cutter and mat
acrylic 6 and 1/2" wide rulers
sewing machine
longarm or midarm quilting machine with some type of channel locks
Step 1: Choose a wide assortment of coordinating fabrics. These are from Cranston Printworks and Robert Kaufman fabrics. You will want some light, some medium, and some dark that go together, but still have some contrast. I chose pinks, blacks, and lime greens.


Step 3: Cut the 4 inch wide strips into rectangles of various lengths. I cut most of mine 6 and 1/2 inches since that was the size of the ruler I was using. I also cut some into 5 inch long rectangles and even ended up with some left over squares.

 |
| You will end up with several stacks of 4 inch wide rectangles and squares. |
Step 4: From your white fabric, cut off a piece 90" x 72" to use as backing. Cut the remaining white fabric into strips. I made mine 5 and 1/2" x 90". Lay those strips and the large backing piece aside.

Step 5: Take the colored rectangles you cut earlier to your sewing machine. You will be randomly piecing them together to create 90" long strips.
 |
| I have a 1/4" foot for my machine. |
Just sew the short edges of the rectangles together using a 1/4" seam allowance. Try not to repeat the colors too close together unless you want a very patterned look.


You will end up with several strip sets. Press the seams flat on these. Be careful not to stretch the long strips.
Step 6: Load your backing fabric onto your longarm machine.

Then lay your batting on top of that.
Step 7: Engage the channel lock on your machine so you can make a straight, horizontal line. (Mine uses clamps to hold the wheels in place) Stitch across the top edge of the backing and batting sandwich. This marks the line where you will lay your first strip.


Step 8: Lay your first white strip (right side up if using colored fabric instead) with the top edge just above the line you just stitched through the backing and batting. Now stitch that exact same line again, this time capturing your first white strip.

Then pin the strip down through the batting and backing so it doesn't flip when you sew on the first colored strip.
Step 9: Lay the first colored strip, right side down, on top of the white strip you just attached. Align the bottom edges together. (You might need to place a pin here and there to keep things in place). Reposition your machine and stitch the edges together.


Flip the colored strip down and it should look like this

Step 10: Then lay a white strip, (face down if using a colored fabric) on top of the colored strip, matching the bottom edge. Reposition your machine and sew across.

Flip this open and you have this

Just repeat steps 9 and 10 until you have used all your strips.

Then go back and add some quilting to your strips if you want.

Then, all you'll need to do is remove it from the frame and add the binding (or add it with the longarm). You will end up with a fun, fast quilt like the one below.
 |
| I hadn't stitched the binding closed when I took this picture. |
I hope you make one of these Quicky Quilts. The entire thing took me one afternoon to make, less than 5 hours. Be sure to leave me a comment and send me a picture of the quilts you make.
Subscribe to:
Comments (Atom)