Here is something new! Let's have a contest. Since it's July, let's make it a Christmas in July contest.
To enter, just leave a comment telling what Christmas quilting projects you are planning to make and where you got the pattern or inspiration.
I will start us off by saying that I plan to finish up a couple of Christmas UFO's that are in the closet in the sewing room. There are two throws that need to be quilted that were created after I read an article about Quick and Easy Quilts, and there's a wall hanging that needs to have the piecing finished. It is from a kit I ordered long ago from Keepsake Quilting. With any luck I'll finish these before Thanksgiving (just being realistic here).
So, what about you? What are you planning to complete before the holidays arrive? Enter your comments for a chance to win. One lucky reader will be randomly selected on August 15th. The winner will receive 6 Christmas themed fat quarters.

Thursday, July 18, 2013
Tuesday, July 16, 2013
Quicky Quilt
Get your mind out of the gutter- it's not about that! The weekend before the 4th of July found me working fast to try to make strip quilts for the grandkids' new bunk beds, since they would be coming to visit. I knew I needed something eye catching and fun, yet quick to make. So I adapted Dawn Cavanaugh's strip pieced placemat pattern and created quilts on the longarm machine. Here are step by step instructions for anybody who wants to make on of these super quick, super easy quilts. Don't worry if you don't have a longarm machine; you can easily create this on your domestic sewing machine with a large table to support the weight of the fabric, batting, and backing layers.
Supplies needed: 44-45" wide quilters cottons in various colors (around 10 fat quarters)
90" wide white cotton for strips and backing (5 yards)
90x108" quilt batting
rotary cutter and mat
acrylic 6 and 1/2" wide rulers
sewing machine
longarm or midarm quilting machine with some type of channel locks
Step 1: Choose a wide assortment of coordinating fabrics. These are from Cranston Printworks and Robert Kaufman fabrics. You will want some light, some medium, and some dark that go together, but still have some contrast. I chose pinks, blacks, and lime greens.
 Step 2: Cut the fabrics into strips along the straight of grain. I cut mine 4 inches wide by the width of the fabric (44 or 45").


Step 5: Take the colored rectangles you cut earlier to your sewing machine. You will be randomly piecing them together to create 90" long strips.
Just sew the short edges of the rectangles together using a 1/4" seam allowance. Try not to repeat the colors too close together unless you want a very patterned look.


You will end up with several strip sets. Press the seams flat on these. Be careful not to stretch the long strips.

Step 6: Load your backing fabric onto your longarm machine.

Then lay your batting on top of that.
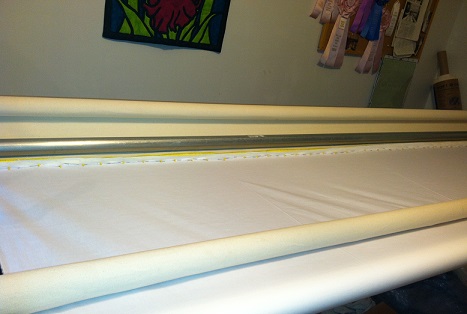
Step 7: Engage the channel lock on your machine so you can make a straight, horizontal line. (Mine uses clamps to hold the wheels in place) Stitch across the top edge of the backing and batting sandwich. This marks the line where you will lay your first strip.


Step 8: Lay your first white strip (right side up if using colored fabric instead) with the top edge just above the line you just stitched through the backing and batting. Now stitch that exact same line again, this time capturing your first white strip.

Then pin the strip down through the batting and backing so it doesn't flip when you sew on the first colored strip.
Step 9: Lay the first colored strip, right side down, on top of the white strip you just attached. Align the bottom edges together. (You might need to place a pin here and there to keep things in place). Reposition your machine and stitch the edges together.


Flip the colored strip down and it should look like this


Flip this open and you have this


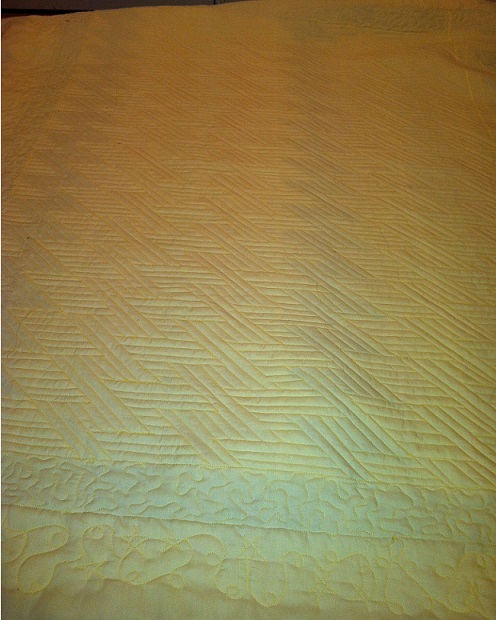
Then, all you'll need to do is remove it from the frame and add the binding (or add it with the longarm). You will end up with a fun, fast quilt like the one below.
I hope you make one of these Quicky Quilts. The entire thing took me one afternoon to make, less than 5 hours. Be sure to leave me a comment and send me a picture of the quilts you make.
Supplies needed: 44-45" wide quilters cottons in various colors (around 10 fat quarters)
90" wide white cotton for strips and backing (5 yards)
90x108" quilt batting
rotary cutter and mat
acrylic 6 and 1/2" wide rulers
sewing machine
longarm or midarm quilting machine with some type of channel locks
Step 1: Choose a wide assortment of coordinating fabrics. These are from Cranston Printworks and Robert Kaufman fabrics. You will want some light, some medium, and some dark that go together, but still have some contrast. I chose pinks, blacks, and lime greens.


Step 3: Cut the 4 inch wide strips into rectangles of various lengths. I cut most of mine 6 and 1/2 inches since that was the size of the ruler I was using. I also cut some into 5 inch long rectangles and even ended up with some left over squares.

 |
| You will end up with several stacks of 4 inch wide rectangles and squares. |
Step 4: From your white fabric, cut off a piece 90" x 72" to use as backing. Cut the remaining white fabric into strips. I made mine 5 and 1/2" x 90". Lay those strips and the large backing piece aside.

Step 5: Take the colored rectangles you cut earlier to your sewing machine. You will be randomly piecing them together to create 90" long strips.
 |
| I have a 1/4" foot for my machine. |
Just sew the short edges of the rectangles together using a 1/4" seam allowance. Try not to repeat the colors too close together unless you want a very patterned look.


You will end up with several strip sets. Press the seams flat on these. Be careful not to stretch the long strips.
Step 6: Load your backing fabric onto your longarm machine.

Then lay your batting on top of that.
Step 7: Engage the channel lock on your machine so you can make a straight, horizontal line. (Mine uses clamps to hold the wheels in place) Stitch across the top edge of the backing and batting sandwich. This marks the line where you will lay your first strip.


Step 8: Lay your first white strip (right side up if using colored fabric instead) with the top edge just above the line you just stitched through the backing and batting. Now stitch that exact same line again, this time capturing your first white strip.

Then pin the strip down through the batting and backing so it doesn't flip when you sew on the first colored strip.
Step 9: Lay the first colored strip, right side down, on top of the white strip you just attached. Align the bottom edges together. (You might need to place a pin here and there to keep things in place). Reposition your machine and stitch the edges together.


Flip the colored strip down and it should look like this

Step 10: Then lay a white strip, (face down if using a colored fabric) on top of the colored strip, matching the bottom edge. Reposition your machine and sew across.

Flip this open and you have this

Just repeat steps 9 and 10 until you have used all your strips.

Then go back and add some quilting to your strips if you want.

Then, all you'll need to do is remove it from the frame and add the binding (or add it with the longarm). You will end up with a fun, fast quilt like the one below.
 |
| I hadn't stitched the binding closed when I took this picture. |
I hope you make one of these Quicky Quilts. The entire thing took me one afternoon to make, less than 5 hours. Be sure to leave me a comment and send me a picture of the quilts you make.
Sunday, June 30, 2013
Do you know about Quilt of Valor?
The Quilt of Valor project is a program where quilt piecers make tops and send them to longarm quilters for finishing. The quilts then go on to injured soldiers from all branches of the military. It is a great honor to create these gifts for service members who have sacrificed so much to protect our homes and our freedoms. I encourage each of you to piece a top and contact Quilts of Valor to get it quilted and sent to an injured soldier. The top doesn't have to be large, 60 x 80 will do. It can be a very simple pattern, or extremely complex. It's up to you. Here are pictures of the two I quilted today. One has the Circle Lord spirals on it. The other has loops and cookie cutter stars....really, I used the Wilton Christmas cookie tree cutters to make the stars. Please leave your comments below. I will personally respond to every comment.


Saturday, June 29, 2013
Frustrations
One of the frustrations of owning a longarm machine is that it is a very delicate piece of machinery, and something can easily go wrong. Well, I've had my fair share of problems this week.... about 4 days worth.
To begin with, something caused a fuse to blow....it might have been a power surge, it might have just been time for the fuse to die. Either way, it was dead. So my DH got it working for me. We were sailing right along, practicing using specialty threads and making a bobbin chart. Then I decided to practice some curved crosshatching and ran over the plastic ruler I was using as a guide. Well, not only did I break the needle but the machine jammed and guess what, the fuse blew again. I was not happy, but the great folks at APQS told me to go to Radio Shack for a new fuse. We do live in a very small town, but there is a Radio Shack nearby. So I drove to Radio Shack for a new fuse. They didn't have one. It's a special order only item- a week, they said. Not good.
In the meantime I drew the designs and patterns for Carol's custom quilt, and began calling quilt shops to find the wool batting we decided on. Nobody within 75 miles had any. The closest place I found that had some was Hancocks in Paducah. It's about an hour and a half drive, but we did it yesterday. I got the batting, but they didn't have any MonoPoly thread and they didn't have a new curved ruler. We were able to locate Radio Shack and get the fuses for the machine so I could quilt again.
This morning I put the new fuse in and threaded the needle. I turned the hand wheel to pick up the bobbin thread and THUNK! the needle wouldn't go down. The jamming machine had jumped timing and had to be re-timed.. Now, this is a long, precise process; but we did it. Three times. Finally the machine was able to stitch again, but every time I try to use any speed the top thread breaks. Well, I've been all afternoon fighting to finish a teeny, tiny Quilt of Valor. I'm about 2/3 done. I'll finish it in the morning, then tackle the timing issue again. Maybe fourth time will be the last time. We'll wait and see.
Monday, June 24, 2013
Finally finished
Finally finished. Can you believe this little quilt (62 x 76) took over 38 hours to complete? The pieces were small and the quilting was tedious. The entire body was done with ruler work, 1/2 inch lines overall. The borders are a freehand mini meander and a loop and star pattern. Enjoy the pictures. Tomorrow I will start on the QOV using the Circle Lord Spirals.


Friday, June 21, 2013
It's like Christmas around here
The packages just keep arriving. Actually, they should all be here by now. One contained a pantograph I had ordered from another quilter who was cleaning out her studio. That will be fun to stitch out.
The second contained Carol's wonderful self-designed pattern quilt that I get to do custom feathers on. I have to get her permission to post a picture, but you will really love it, I'm sure.
The second contained Carol's wonderful self-designed pattern quilt that I get to do custom feathers on. I have to get her permission to post a picture, but you will really love it, I'm sure.
And the last package contained the thing I've been waiting for, the Circle Lord adapter so I can use my Circle Lord to make beautiful quilted spirograph designs on my APQS Lenni longarm. I already have the quilt in mind for that little adventure. Pictures and a video of how it's done will be posted.
Thursday, June 20, 2013
Lightning Strikes!
What are Lenni and I up to today? Well, we're waiting for the afternoon thunderstorms the weatherman just promised, but hopefully those won't be severe. We are also working on another pretty customer quilt. This one looks like lightning bolts. Here are a couple pictures of our progress so far. I'll be sure to post the finished quilt under customer quilts.


Wednesday, June 19, 2013
First customer quilt off of Lenni

Today Lenni and I finished our first customer quilt together. Now I've quilted hundreds of customer quilts, but never on this new machine. It was bliss. There were no tension issues, the stitches looked great, and everything just sort of went together. The quilt was made by Nadine from Dyersburg. It is a variation of an Irish chain. She used lovely shades of teal and brown. The backing fabric is teal with brown polka dots. How cute is that. She provided the batting, Polyfil high loft polyester. I chose Superior Highlights #309 thread. It matched the backing fabric perfectly. I quilted the entire top with terry twists, and did a piano key border treatment. The finished quilt measures 90 x 90. I couldn't fit the whole thing into a picture, but here are a few.
Tuesday, June 18, 2013
Studio renovation complete
I mentioned a few weeks ago, on my website, that I would not be quilting for a couple weeks because we were remodeling the room that houses the quilting studio. Well, those renovations are complete. It's so exciting because now I can get back to quilting on my APQS Lenni longarm machine. I have customer quilts in house and lined up to be shipped. It's very exciting to be back to longarm quilting after having to take a year off.
 |
| After ripping up the carpet and starting on the floor. |
 |
| The finished room. Isn't it beautiful? |
Subscribe to:
Posts (Atom)